Inflating a Weather Balloon
What You Need
- Helium Gas Cylinder - You can rent one from many party and welding supply stores.
- High Altitude Science Inflation System - Our inflation system allows you to safely and easily transfer helium from your gas cylinder into your balloon.
- Launch Scale - Used to measure how much lift your weather balloon is generating. It comes standard with our Inflation System Kit.
- Weather Balloon - In this tutorial we use our 350 g Weather Balloon.
- Helpers - Inflating a weather balloon on your own is very challenging, even if you're experienced.
 Safety First It is very important that your inflation system has a built in gas regulator and only uses high pressure hose. Helium gas cylinders are pressurized between 1,800 and 2,000 PSI. Working with such high pressure gas can cause serious injury. This is why a gas regulator is so important. It attaches directly to your helium gas cylinder valve and reduces the pressure to less than 200 PSI. This ensures that the maximum pressure inside your inflation hose never exceeds 200 PSI. If you were to inflate your balloon without a gas regulator and accidentally stepped on the hose or twisted a kink into the hose, the unregulated pressure would cause the hose to explode. The high-pressure gas explosion could cause the inflation hose to lash back with enough force to cause serious injury. However, if the pressure inside the hose never exceeded 200 PSI because it had a gas regulator supplying it with helium it would not explode if you were using high pressure hose. The hose on our Balloon Inflation System is rated at 300 PSI which is well above the maximum pressure supplied by the gas regulator.
 Step 1 - Find an open field away from trees, tall buildings, power lines, etc. Your school's football or baseball field, a large park, public open space, etc. are all good options.
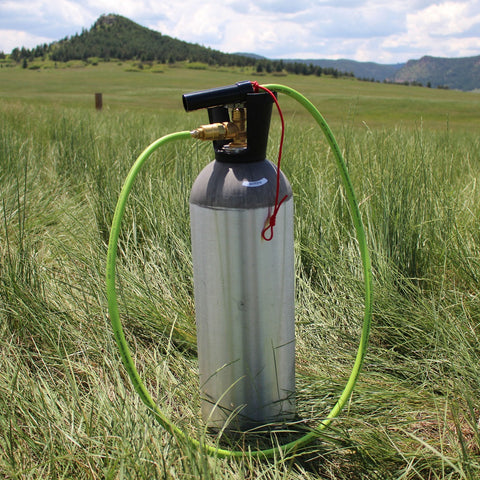 Step 2 - Attach the inflation system to your helium gas cylinder. The regulator on the inflation system screws directly into the valve at the top of the gas cylinder. Do not use a wrench to tighten the pressure regulator onto the gas cylinder valve as this will damage the rubber O-ring seal. A hand tight seal is more than adequate. If you're using a large industrial gas cylinder, lie it on its side so it can't fall over and hurt someone. In this tutorial we're using a lightweight aluminum 55 cu.ft. gas cylinder (a common rental size at many Party City stores).
 Step 3 - Insert the inflation system nozzle into your weather balloon's neck. Do not unroll the weather balloon yet. It is much easier to work with the balloon's neck when the balloon is still rolled up.
 Step 4 - Secure the weather balloon to the inflation system nozzle. Wrap both the neck of the balloon and the bottom of the inflation nozzle together with electrical tape. This locks the balloon to the inflation nozzle and prevents it from accidentally slipping off the inflation nozzle and floating away during the inflation process. You don't want to "launch" your weather balloon without a payload! We do not recommend using a bungee cord to clamp the balloon neck to the inflation system nozzle. If the bungee cord slips, it can whip around and hit you in the eye.
 Tip When you cut the electrical tape, fold the end of the electrical tape over onto itself to make a pull-tab. This makes it a lot easier to remove the electrical tape and disconnect the weather balloon from the inflation nozzle once you're done inflating your balloon.
 Step 5 - Unroll the balloon and prepare it for inflation. Before you start to inflate your weather balloon, have your helper hold the balloon loosely over their forearms. Your helper should always stand downwind of the balloon neck / inflation nozzle. Depending on the size of your weather balloon, you may need to line up more than one helper. For this tutorial we are using our 350 g balloon. Make sure your helper isn't wearing glasses, sharp jewelry, etc. that can snag or puncture the weather balloon. It is also important to keep the balloon from touching the ground as grass, dirt, leaves, sticks, etc. can damage the balloon envelope.
 Step 6 - Carefully start inflating your weather balloon. Slowly open the valve on your helium gas cylinder to begin inflating your balloon. Always keep one hand on the valve so you can easily control the rate at which you inflate your weather balloon.
 Step 7 - Let the balloon lift itself out of your helpers forearms. Eventually the balloon will rise out of your helper's arms. You can now start measuring your balloon's lift.
 Step 8 - Inflate your balloon until it has the right amount of lift. When measuring your balloon's lift, make sure there is slack in the inflation hose. You want all of the balloon's lift to be pulling up on the scale, not the inflation hose. Don't forget to add the weight of the inflation nozzle to the reading on the scale. The inflation nozzle weighs 100 grams, so if your scale measures a lift of 700 grams, your balloon is actually generating 800 grams of lift (measurement on scale plus the weight of the inflation nozzle). Keep inflating your balloon until you have the right amount of lift (see our Balloon Performance Calculator Tutorial). If your target lift is 1,000 grams, you'll want to inflate your balloon until your scale reads 900 grams (target lift minus the weight of the inflation system nozzle). Once your balloon has the right amount of lift, shut off the supply of helium.
Next
FAQs
Do you need to wear gloves when handling a weather balloon?
There's a popular theory that natural oils on your hands will contaminate the balloon. We've launched missions with and without gloves. We have never noticed a difference in balloon performance in either case. Working with gloves is awkward and uncomfortable, but it also looks more professional. If you're launching a balloon for a client or in front of a lot of spectators, wear the gloves. If it's just you and a small research team and you don't believe the "oily hands" theory, keep them off.